sebastiandaschner blog
Running complex project setups with Testcontainers
wednesday, august 25, 2021In a lot of my #testing content, I’ve been showing how to run projects locally, for example by using Docker containers. In this video, I’m showing how to build up a complex project setup using Testcontainers, while keeping a flexible and efficient development workflow.
My goal is to separate the life cycles of my system / acceptance tests from the test environment’s life cycle, in order to allow for quick turnarounds and to re-use my test scenarios in different scopes. In this way, this shows how to build up what I’d consider a local test environment that is optimized for developer productivity.
To try it out yourself, you can find the source code on GitHub: coffee-testing
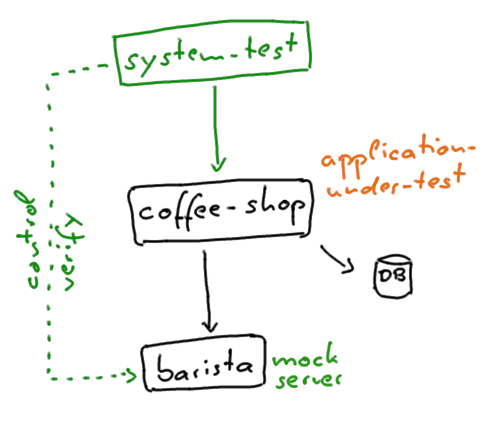
The example contains the following coffee-shop system:

The three containers (black in the picture) are started by Testcontainers, but separately from my test scenarios:
public class CoffeeShop {

    static Network network = Network.newNetwork();

    static GenericContainer<?> barista = new GenericContainer<>("rodolpheche/wiremock:2.6.0")
            .withExposedPorts(8080)
            .waitingFor(Wait.forHttp("/__admin/"))
            .withNetwork(network)
            .withNetworkAliases("barista");

    static PostgreSQLContainer<?> coffeeShopDb = new PostgreSQLContainer<>("postgres:9.5")
            .withExposedPorts(5432)
            .withDatabaseName("postgres")
            .withUsername("postgres")
            .withPassword("postgres")
            .withNetwork(network)
            .withNetworkAliases("coffee-shop-db");

    static GenericContainer<?> coffeeShop = new GenericContainer<>(new ImageFromDockerfile("coffee-shop")
            .withDockerfile(Paths.get(System.getProperty("user.dir"), "../coffee-shop/Dockerfile")))
            .withExposedPorts(8080)
            .waitingFor(Wait.forHttp("/q/health"))
            .withNetwork(network)
            .withNetworkAliases("coffee-shop")
            .dependsOn(barista, coffeeShopDb);

    @Test
    void startContainers() throws IOException {

        Startables.deepStart(coffeeShop, barista, coffeeShopDb).join();

        String coffeeShopHost = coffeeShop.getHost();
        int coffeeShopPort = coffeeShop.getMappedPort(8080);
        String baristaHost = barista.getHost();
        int baristaPort = barista.getMappedPort(8080);

        writeDotEnvFile(coffeeShopHost, coffeeShopPort, baristaHost, baristaPort);

        String uri = "http://" + coffeeShopHost + ":" + coffeeShopPort + "/index.html";
        System.out.println("The coffee-shop URLs is: " + uri);
        System.out.println("\nContainers started. Press any key or kill process to stop");
        System.in.read();
    }

}
As shown in the video, you can run the example in your IDE or via the command line:
mvn -Dtest=com.sebastian_daschner.coffee_shop.CoffeeShop test
The reason why these classes are called CoffeeShop and CoffeeShopDev, respectively, is that they won’t be executed via Maven Surefire per default, since they don’t contain the sequence Test.
Network configuration
Since Testcontainers urges us to have a non-fixed setup, here with regards to port bindings, we need to reconfigure our URLs for in test scenarios and for manual access. Our test environment has been started in a separate JVM, which is why the Testcontainers code has no access as to which dynamic ports have been assigned.
We could find out the actual ports by using docker ps or similar methods:
$> docker ps
CONTAINER ID   IMAGE                  [...] STATUS          PORTS
cad0913a4787   coffee-shop:latest           Up 2 seconds    0.0.0.0:49230->8080/tcp, :::49230->8080/tcp
a1dd67f758e5   rodolpheche/wiremock:2.6.0   Up 19 seconds   8081/tcp, 0.0.0.0:49228->8080/tcp, :::49228->8080/tcp
aa3759e70103   postgres:9.5                 Up 19 seconds   0.0.0.0:49229->5432/tcp, :::49229->5432/tcp
1113ebda12b4   testcontainers/ryuk:0.3.1    Up 20 seconds   0.0.0.0:49227->8080/tcp, :::49227->8080/tcp
However, still there would be manual effort involved, to find out and configure the URLs, such as localhost:49228, :49229, and :49230, each and every time.
Thus, we use a way to automatically re-configure our system tests.
Our CoffeeShop class will write the port configuration into a .env file, which will be read from our system test, via MicroProfile Config, here with Smallrye as the implementation:
Config config = ConfigProvider.getConfig();
String host = config.getValue("coffee-shop.test.host", String.class);
String port = config.getValue("coffee-shop.test.port", String.class);
return UriBuilder.fromUri("http://{host}:{port}/orders")
        .build(host, port);
The code on GitHub and the video gives you the full picture of how the URLs are configured.
Per default, the values from a microprofile-config.properties is taken, or the properties in .env with a higher priority.
# META-INF/microprofile-config.properties
coffee-shop.test.host=localhost
coffee-shop.test.port=8001
barista.test.host=localhost
barista.test.port=8002
# .env, written by CoffeeShop class
COFFEE_SHOP_TEST_HOST=localhost
COFFEE_SHOP_TEST_PORT=49230
BARISTA_TEST_HOST=localhost
BARISTA_TEST_PORT=49228This enables us to start up the environment, and use the system tests in a very fast and flexible way, as shown in the video.
Quarkus remote-dev mode
It also works to run Quarkus' dev mode in containers, as remote-dev mode.
My second Testcontainers example, that you find in the class CoffeeShopDev, starts up the coffee-shop application in a way that allows to be accessed by quarkus:remote-dev.
This is really handy for us, since we don’t have to start & stop our application while we’re coding.
The CoffeeShopDev class will output the mvn command with the correct port, similar to:
mvn quarkus:remote-dev -Ddebug=false -Dquarkus.package.type=mutable-jar \
  -Dquarkus.live-reload.url=http://localhost:49230 -Dquarkus.live-reload.password=123
Shortening the test turnaround time
As one more bonus, I’m showing how to even shorten the initialization & waiting time of our tests, by (mis-)using quarkus:dev for our system test project, which in fact is not even a Quarkus project.
This is the same approach that I’ve been showing in a previous video.
We can run the example, similar to what is shown in this video, as follows:
cd coffee-shop-st/
mvn quarkus:dev -Ptest \
-Dquarkus.test.exclude-pattern='.*\.CoffeeShop|.*\.CoffeeShopDev|.*UITest'
Trying it out yourself
You can find the source code on GitHub: coffee-testing
Found the post useful? Subscribe to my newsletter for more free content, tips and tricks on IT & Java: